|
I. Logging In
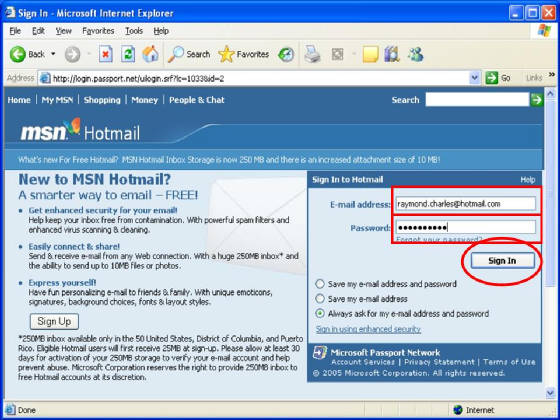
- Open the page www.hotmail.com.
- Type your e-mail address into the box next to the words “E-mail address,” and your password next to the
words “Password” on the right-hand side of your screen.
If you are using a public computer,
before signing in, make sure that you have selected the option “Always ask for my e-mail address and password”
underneath the sign-in box. By selecting this option, you are ensuring that the next person to visit the Hotmail site does
not see your e-mail address. If you are using a home computer, you can either select “Save my e-mail address,”
which will fill in your address for you whenever you visit Hotmail, or “Save my e-mail address and password” which
will log you directly into your inbox whenever you visit Hotmail. For security reasons, I do not recommend “Save my
e-mail address and password.”
II. Checking Your E-Mail
1.
To read the e-mail from your contact – if there is one – click on the name of the sender.
Click here to move on.
2.
To view your inbox, click on “My Messages.” Click here to move on.
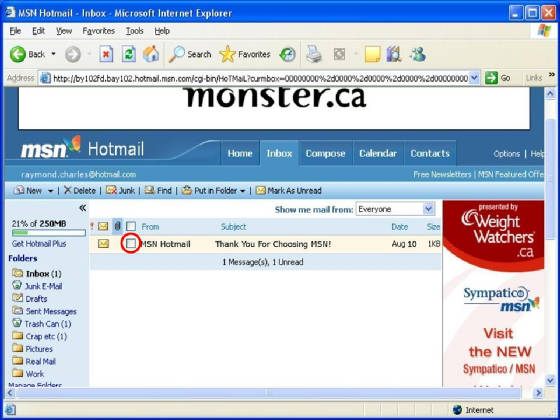
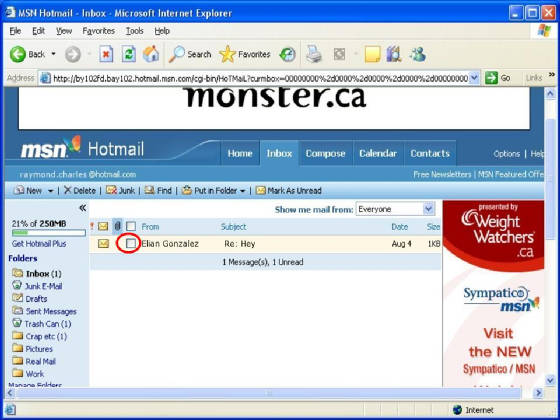
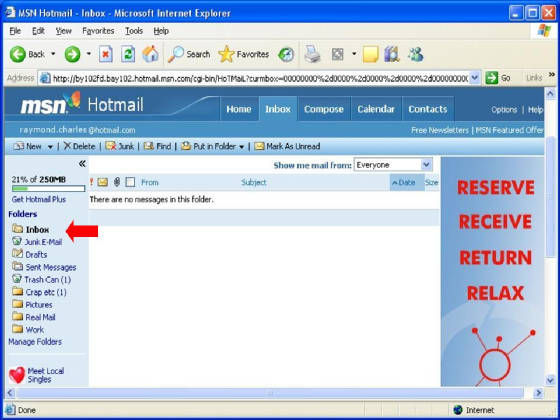
You will now be brought to your “Inbox.” This will
display a list of any e-mail you have received – unless it has been sorted to Junk Mail, etc. Any messages with un-opened
envelope icons next to the sender are messages you have not viewed yet. They will also be highlighted in light yellow. Opened
envelope icons indicate read messages. Envelope icons with a question mark are messages from people not on your contact list
(your address book). Envelopes with butterfly icons are service messages from MSN.
III. Reading Your E-Mail
1. Click on the name of the sender of the e-mail you wish to
read.
From here you can delete,
reply, forward, or sort this mail.
IV. Composing and Sending or Saving an E-Mail
You may start a new e-mail
from your “Home” page, your Inbox, or the message screen. Regardless, you will need to follow the same steps.
** To learn how
to get to your “Home” page, Inbox, or the message screen, click on the desired destination.
- Click on “New” or “New Message.” This is the icon on the far left, with an envelope and letter
on it.
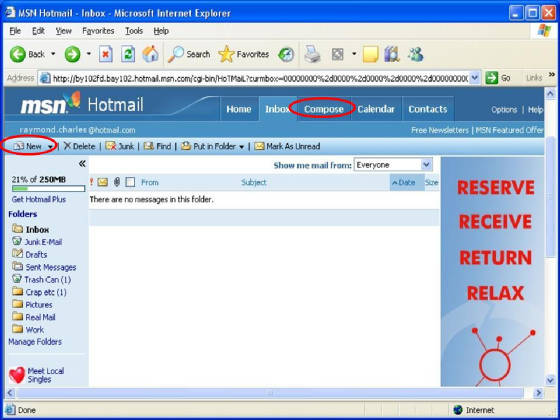
A blank message screen
should come up.
- Enter the e-mail address of the recipient into the “To:” field.
- Enter the topic of the message into the “Subject:” field. It is not absolutely necessary to fill in the
subject field, but it will let your recipient know what the e-mail is about.
- Type your message into the blank box below the “Subject:” field.
If this is your
first time creating a message, you may wish to turn on the Rich-Text Editor, which allows you to make changes to your text,
similar to the changes available in word processing programs.
** To learn
how to turn on the Rich-Text Editor, click here.
- If you would like to save your message and send it later, click on the “Save Draft” button, which shows
a folder, paper, and pencil.
The message will
be stored in your “Drafts” folder.
** To learn how to access your various folders,
click here.
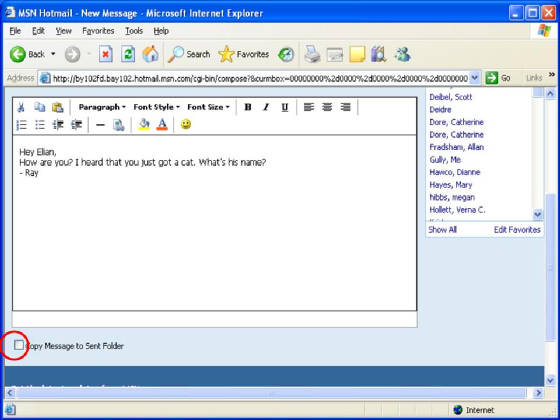
- If you would like a copy of your e-mail saved after you send it, click on the check-box next to the words “Copy
Message to Sent Folder.” This box is found under the blank box where you typed your message.
If you do not select this box, you will not receive a copy of the message you
send. Once you send it, you will not be able to read it again.
- When you are ready to send your e-mail, click on the “Send” button, which is on the right-hand side, and
shows a single white envelope.
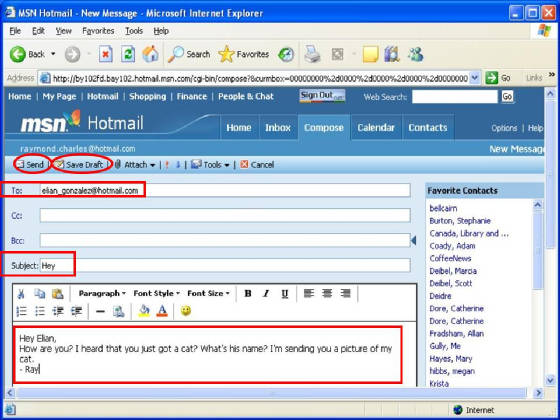
You will be taken
to a confirm screen, where a box will appear telling you if your e-mail was successfully sent, and the recipient(s). If the
recipient(s) have not already been added to your contacts (address book), you will be able to do so from this screen.
** To learn how to add contacts, click here.
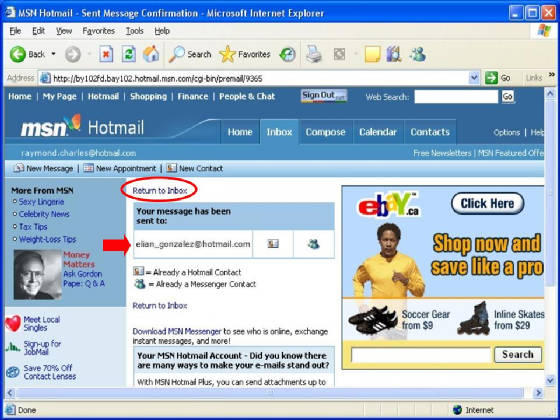
If you are finished, and wish to return to your inbox, click on “Return
to Inbox,” which should appear above the “Your message has been sent to:” box.
V. Deleting E-Mail
From your inbox:
**
To learn how to get to your inbox, click here.
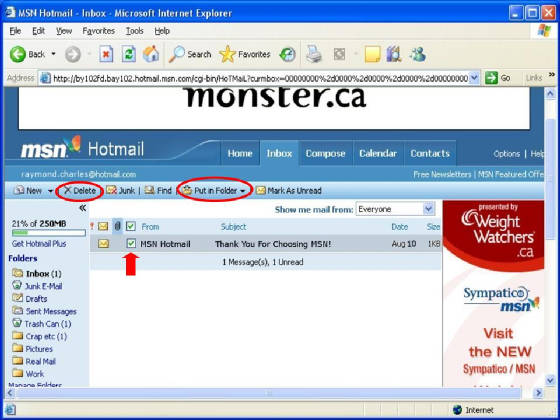
1.
Click on the check-box next to the name of the sender.
2.
Click on the “Delete” button, which is the button with the black X.
From the message
screen:
**
To learn how to get to the message screen, click here.
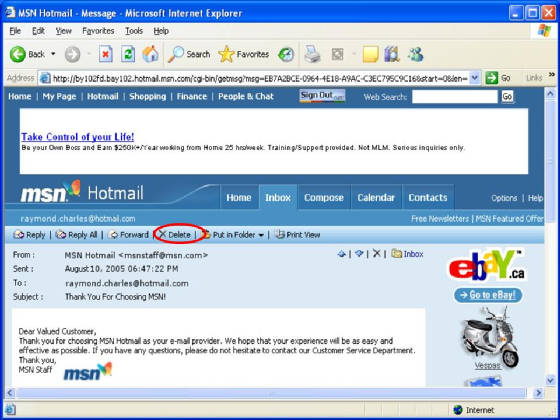
- Click on the “Delete” button, which is the button with the black X.
VI. Replying to an E-Mail
To reply to an e-mail you must be viewing it in the message screen.
** To learn how to get to the
message screen, click here.
- Click on the “Reply” button, which is the button with the single envelope, and the purple, left-pointing
arrow.
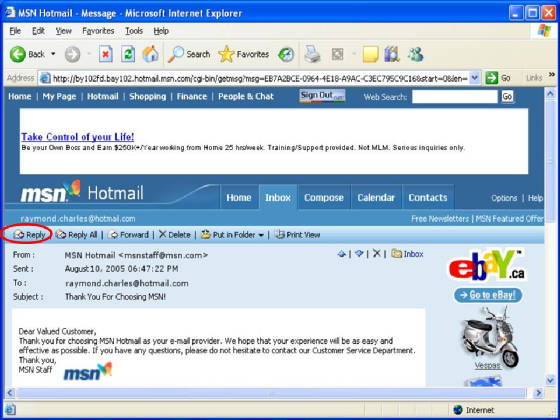
A blank message screen should come up.
VII. Forwarding E-Mail
To forward an e-mail, you must be viewing
it in the message screen.
** To learn how to get to the message
screen, click here.
- Click on the “Forward”
button, which is the button with the single envelope, and the white, right-pointing arrow.
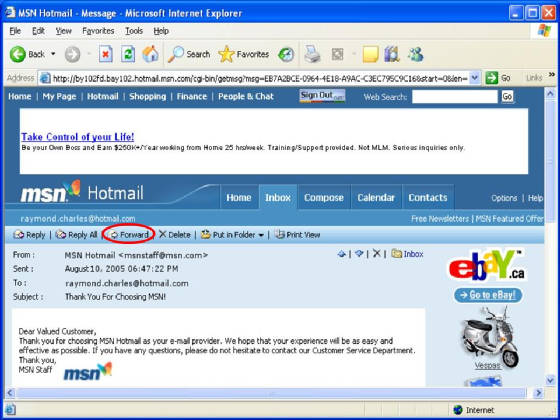
A blank message screen should come up.
**To learn how to
compose and send this e-mail, click here.
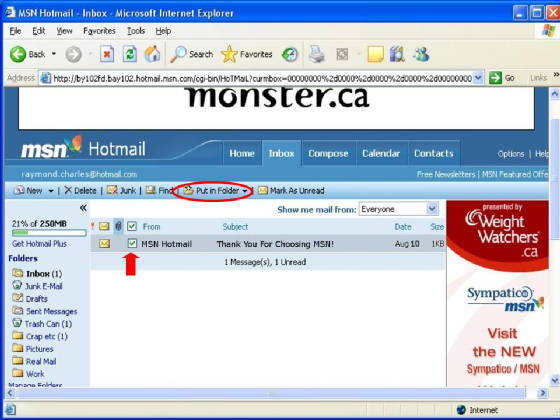
VIII. Sorting Your E-Mail
From your inbox:
**
To learn how to get into your inbox, click here.
- Click on the check box next to the name of the sender.
2.
Click on the “Put in Folder” button, which is the button with the yellow folder and blue, down-pointing arrow.
A drop-down menu will appear.
3.
Select the folder you would like to send the selected e-mail to, and click.
IX. Adding Contacts
You can add contacts from your “Home”
page, Inbox, or confirm screen.
** To learn how to get to your “Home” page, Inbox, message screen, or confirm screen, click on the desired destination.
From your “Home Page”:
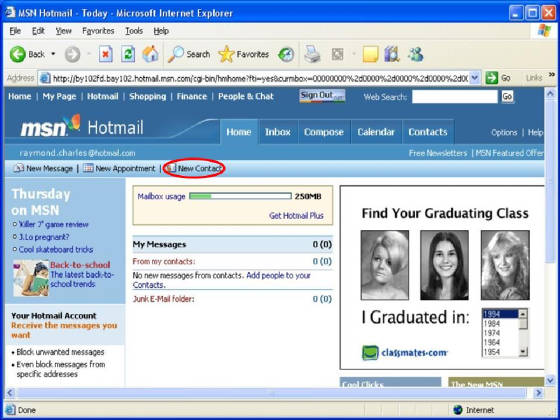
- Click on the “New Contact” button, which displays an ID card, and is located near the middle of your screen.
A form should appear.
** To learn how to fill out this form, click here.
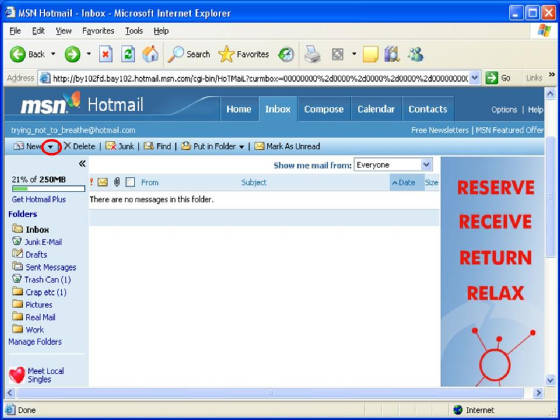
From your inbox:
-
Click on the small black arrow to the right of the “New” button, select “Contact,”
and click.
A form should appear.
** To learn how to fill out this form, click here.
From the confirm screen:
- Click on the check-box under
“Add this address to my contacts” next to the address you would like to add.
- Click “Add.”
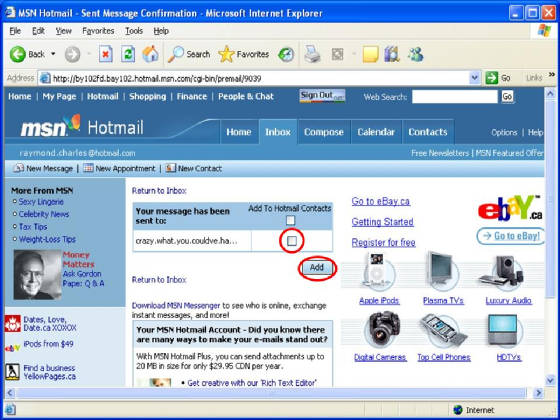
A form will appear.
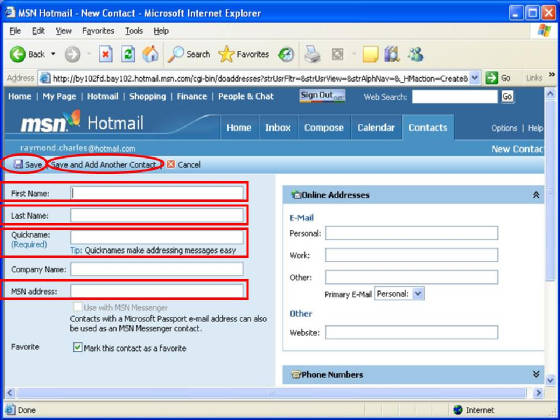
- Fill in the “Quickname” field with the name you would like to use to identify the contact. (For example,
your contact’s first name may be Ruth, but you know her as “Grandma.” Therefore, you would fill “Grandma”
in as the Quickname.)
- Fill in the “First Name” and “Last Name” fields accordingly.

X. Filling Out the Contact Form
To fill out the contact form, you
must be in the form page.
** To lean how to get to the form page,
click here.
- Fill in the “Quickname” field with the name you would like to use to identify the contact. (For example,
your contact’s first name may be Ruth, but you know her as “Grandma.” Therefore, you would fill “Grandma”
in as the Quickname.)
- Fill in the “First Name” and “Last Name” fields accordingly.
- If you have any additional information on your contact, you may add that as well at the bottom of the page. This includes
phones numbers, alternate e-mail addresses, etc.
- If you have finished adding contacts, click on the “Save” button, which displays a floppy disk.
- If you would like to add another contact, click on the "Save and Add Another Contact" button, next to the "Save" button.
XI. Viewing Your Contacts
You can view your contacts from any page, and the steps are the same.
- Click on the “Contacts”
tab.
You should be brought to a
page displaying all of your contacts.
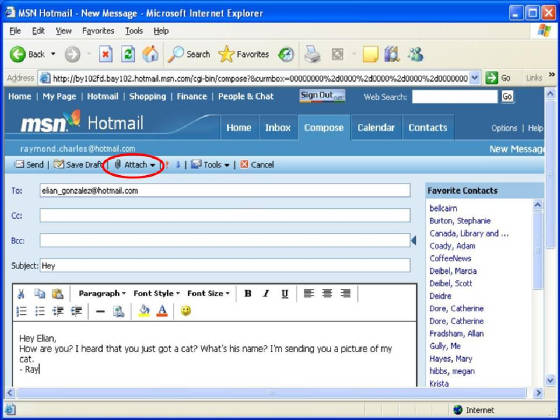
XII. Adding Attachments to Your Outgoing E-Mails
To add an attachment to an outgoing e-mail
(an e-mail you are sending to someone else) you must start from the message screen.
**
To learn how to get into the message screen, click here.
- Compose and address your e-mail as normal.
**
To learn how to compose an e-mail, click here.
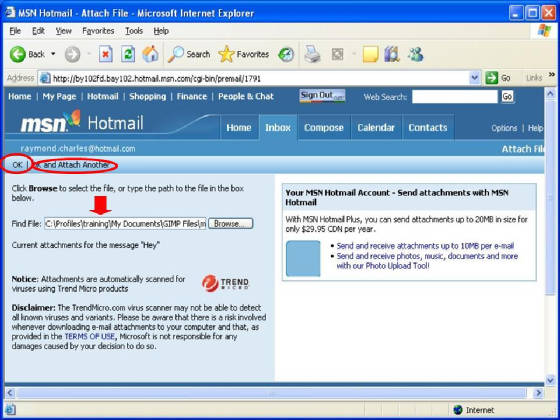
- Click on the “Attach” button, which displays a paperclip.
A drop-down menu will appear.
- Select “File” from the menu, and click.
Even if you are sending a picture,
I recommend using the “File” attachment option, as the “Picture” option involves installing a “photo
loader” from MSN. You can attach pictures to your messages using the “File” option.
You will be taken to a new screen with
one empty field.
- Click on the “Browse” button.
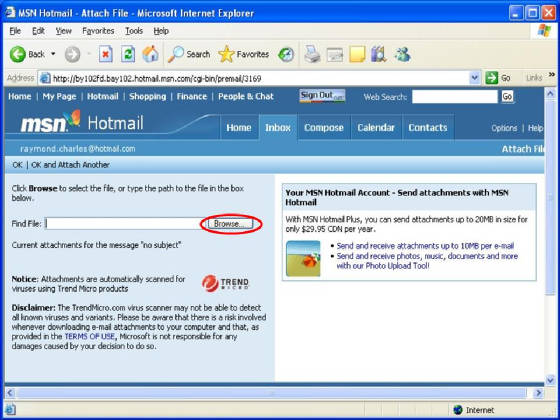
This will open a dialog window showing
the contents of your computer.
- By navigating through the folders on your computer, find the file you want to attach.
You can only attach files created
in a separate program. If you would like to send a copy of an e-mail to someone, use the “Forward” option.
** To learn how to “Forward”
an e-mail, click here.
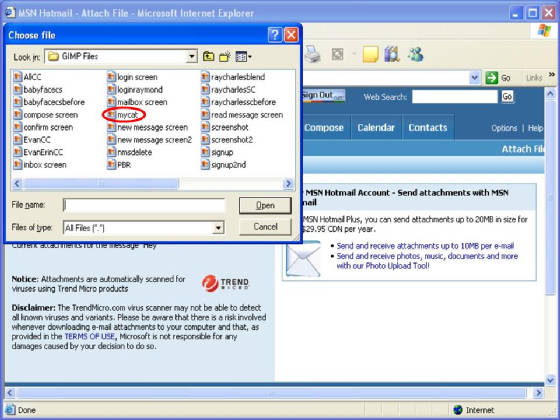
- Click on the file name so that it is highlighted in blue, and the file name appears in the “File Name:”
field.
- Click on the “Open” button.
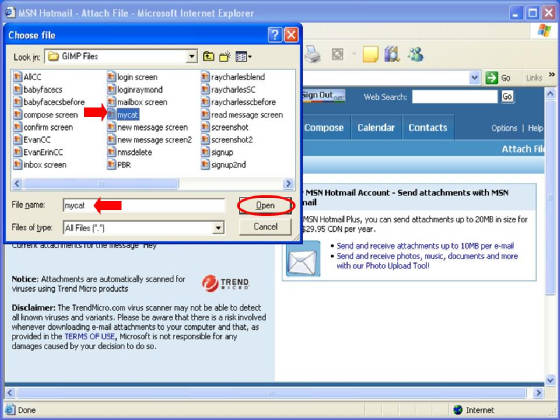
The full name of your file should now be in the previously empty field.
- If you are finished adding
attachments, click on the “Ok” button on the far left.
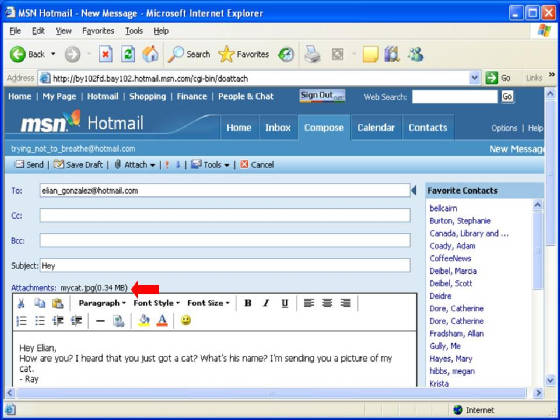
The attachment will be added, and you will be taken back to your message. If
your attachment contains a virus, a bomb with a lit fuse will appear, and Hotmail will not allow you to attach the file.
- If you would like to add more
attachments, click on the “Ok and Attach Another” button on the left.
The attachment will be added, and a new blank field will appear for your next
attachment. Follow steps 4 – 8 to add the attachment(s).
XIII. Turning on the Rich-Text Editor
To turn on the Rich-Text Editor,
you must be in the message screen.
** To learn how to get into the
message screen, click here.
- Click on the “Tools”
button, which displays a single, white envelope and a blue protractor.
A drop-down menu will appear.
2. Select the “Rich-Text Editor ON” option, and click.
3.
The Rich-Text Editor can be turned off by following steps 1 - 2, but clicking instead on the "Rich-Text Editor OFF" option.
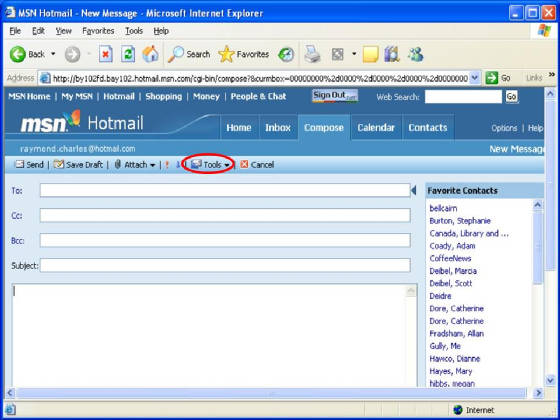
A new box should now sit on top of your blank text box. From there you can
edit your test further.

XIV. Accessing Your Mail Folders
To access your mail folders, you must be in your Inbox.
**
To learn how to get into your Inbox, click here.
- Find your folder list. This will be located beneath your “New” button, and your account capacity bar.
- Click on the folder you wish to open.
Any messages that are located in
that folder will appear as they do in your Inbox. When deleting, reading, and sorting, treat them the same way as you would
any messages in your Inbox.
** To learn how to delete, sort, or read your messages, click on the desired option.
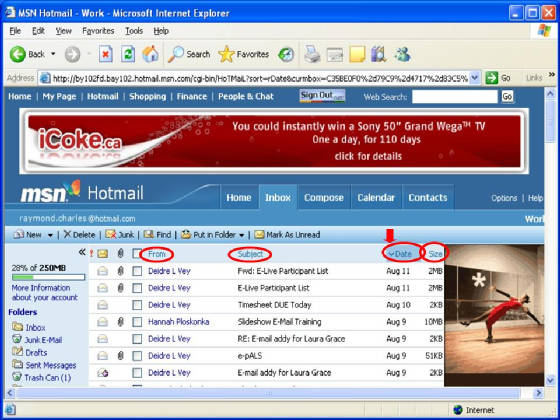
XV. Organizing Your Incoming Messages
To organize your incoming messages, you
must be in one of your message folders (Inbox, etc).
**To learn how to get to your Inbox, or how to access your other mail folders, click on the desired operation.
- Find the “From,” “Subject,” “Date,” and “Size headers above your message
list. They should appear in light blue.
- Click on the header you would like your mail to be sorted according to. (For example, if you would like your messages
to be sorted by the date they were received, click on the “Date” header.)
Your mail will be organized according to
the header you’ve clicked. However, you can also change the direction in which your messages are organized. (For example,
you can change things so that your messages are organized alphabetically by subject, but the ‘A’s start at the
bottom of your list.)
Note the arrow on the left
side of the header you have chosen. If the arrow is pointing up:
- Messages organized by sender will start at the beginning
of the alphabet.
- Messages organized by subject will start at the beginning of the alphabet.
- Message organized by
date will start with the oldest.
- Messages organized by size will start with the smallest.
If the arrow is pointing
down, the opposite will apply.
3.
If you wish to reverse the direction of organization, click again on the header you've chosen, and the arrow will reverse.
Find something we missed? Need a little more clarification?
Click on the "Feedback" button here, or check out our Contacts page. (You'll be giving me something to do.)
|